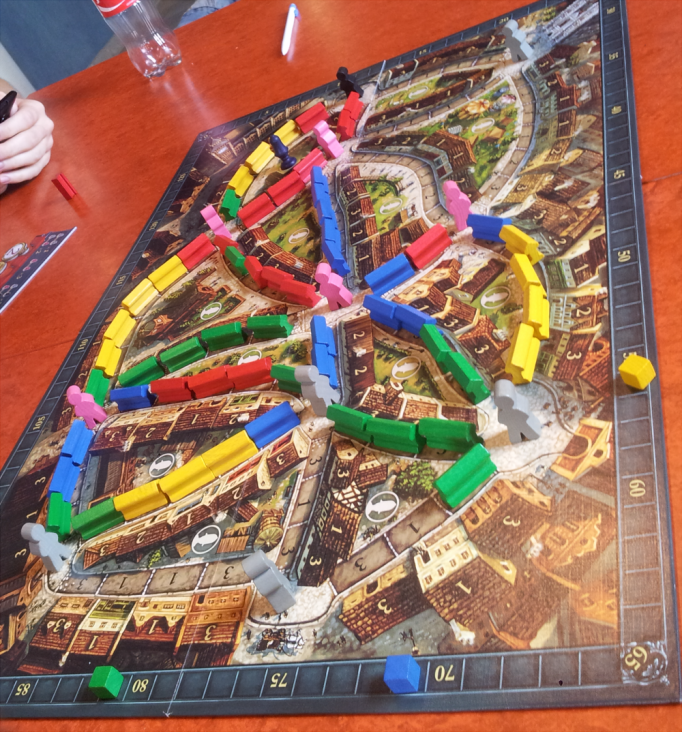
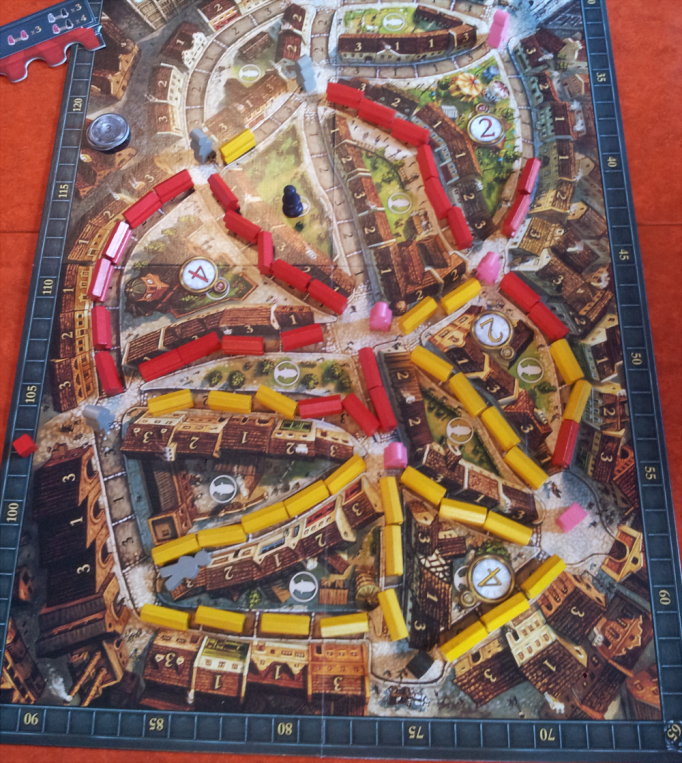
Time for another board game analysis, this time of the game Portobello Market.
This is a game where players compete by strategically placing Market Stalls on the game board, a representation of London (sort of), to score points.
The basics is that you spend an Action Token each turn and place either Market Stalls or randomized Market Visitors for the number of actions gained.
The Action Tokens each have a numeral representing the number of actions that the player will be allowed to take if it is used, and the player regains these tokens once all have been played once.
Two of the tokens that each player starts with also have a special multiplier. These can be spent permanently to gain score from a specified area of the board. They are then replaced by another token without the multiplier, and usually a different numeral.
The Market Stalls can only be places on streets adjacent to the Bobby (a piece representing a police officer), so the player must also manage this piece. He/she may move the Bobby to bordering “regions” (the area between streets) without spending actions, but it often cost points to do so instead.
Within the game we can find a number of systems. Following here is a description of these systems and a look at some of the good and the bad in them.
Define Action System
As the player begins his/her turn it is with the Define Action System. In this system the player decide what Action Token should be used, and if it is supposed to be used for the action points or for the multiplier (if the Action Token allows for this) in a region of the board.
This system is rather minor, and is simply used to define the actions allowed and the number of actions that may be performed in the following Placement System.
Although I found that the game functioned rather well as a whole, relying on rather simple systems, this was most likely the one that I would call the worst.
This was because the Action Tokens could be considered a little bit confusing since they are both used for placing Market Stalls and Visitors as well as for the multiplier. I did notice that there were still questions about how the multiplier was used on our third session.
Placement System
This is the one I would like to call the core system. This is the system that all the others connect to and revolves around, and as a result it becomes the system that I think is the most interesting as well.
This system works like this. First off, depending on the player’s choice of action in the previous system, that is the Define Action System, the player may either place Market Stalls and/or Market Visitors, or one of the multiplier Action Tokens on the board.
If the player chose to place Market Stalls and/or Market Visitors, he/she may place as many of these as the chosen Action Token’s numeral, divided between Market Stalls and Market Visitors as the player desires.
Market Stalls may be placed on streets next to the region that the Bobby is currently in. The streets are divided into segments that each has a score number ranging between 1 and 3. If the street is empty the player may place a Market Stall at either end of it. If the particular street however already has a Market Stall (or several) on it the player must instead place the Market Stall on the available slot next to the Market Stalls already in place.
As the score values differ but the allowed placement is fixed, this adds to the strategic depth of the game. Especially as unfinished streets are not scored at the end of the game, unless the special Visitor called Ruler happens to be connected to one of these (see Final Scoring System).
Which brings me to the action of placing a Visitor. First off, there are two main types of Visitors, the Commoner and the Noble. The types determine what score will be given once streets are filled with Stands. The Noble is of course the more favorable of the two types.
The player starts by drawing one at random and placing it on one of the available squares (as in town square) on the board, which are all linked to the ends of the streets.
Once all the normal Visitors have been placed, the special one called the Ruler is automatically placed on the last available square. Since this is the most favorable Visitor the, players can use the best of their cunning in order to place it as favorable to them as possible.
The final available action is the placement of an Action Token in a region to use its multiplier to gain score from all your Market Stalls placed on streets next to the chosen region. This action however prevents the player from any further actions (including moving the Bobby piece).
I should also add that the placement of one players last Market Stalls signifies the end of the game. Any remaining players on the current round may still finish their move so that the same number of actions have been taken by each player, but once this is finished it’s over to the Final Scoring System and then the game is over.
There are several good points in this system, mostly in relation to the other system however. This gives the game as a whole different levels of strategy, there is seldom only a single thing to be concerned with since you need to place Market Stalls to secure score, but also attempt to increase their value by the Visitor multipliers, and the synergy between streets if you want to utilize the Action Token multipliers.
Adding to this the Bobby Movement System that alters the gameplay quite a bit once players start to get score, it becomes apparent that the life as a street vendor is a tricky one.
Bobby Movement System
Another interesting system. This I would like to call a sub-system to the Placement System. It can only be accessed while the player is engaged in the Placement System, and even more specifically if he/she didn’t choose to place an Action Token for the multiplier.
The Bobby can move across streets to adjacent regions. This may cost the player moving the Bobby one point, unless the player has a majority in the number of placed Stalls on that street. If another player has the majority, the player moving the Bobby must give the other one point. If the street is empty however the player simply loses a point.
This system thus has a very clear relationship with the Placement System, as the player may only place Market Stalls next to the region the Bobby is currently in, and the placement of Market Stalls affect the manner in which the Bobby can move.
This is mainly a relevant strategic element in the beginning of the game, as players often become inhibited from lack of points before the first streets are finished. Once players start to accumulate points however it becomes rather irrelevant as the amount of points is usually not enough to really affect the final scoring.
It was used more effectively in one session when we tried the game with only two players. The player that had the advantage was often able to move the Bobby to “his corner” so that the other player had to give away points to return to the parts of the board where he could continue his strategy.
Scoring System
As described, during gameplay there are two main ways to get score.
The main one is through the placement of Market Stalls to fill up streets and then to place Visitors at each end of these finished streets. The score given will be the total number that each Market Stall slot has, plus a multiplier.
Depending on the combination of visitors at the end of each street the score will be multiplied by x1-x4. Therefore it can be of great strategic value to draw visitors and place the higher tier ones (the Nobles) next to streets that you have majority in, and the lower tier (the Commoners) next to opponent’s streets.
If the Ruler would happen to be placed next to a street that becomes finished it will function like any other visitor, but allowing for the higher multipliers.
The second main way to get score is the placement of the Action Token multiplier in a region. This will immediately give the player score for all the slots on which he/she has got Market Stalls next to the chosen region. This score will then be multiplied by the multiplier number on the chosen Action Token.
In the 2 player session it became apparent that this can amount to very high scores if a player manages to get full dominion in one region.
Final Scoring System
This I decided to add as a separate system since to me it appeared slightly detached from the main Scoring System. It is only relevant when the Ruler has been placed and the game ends with streets that have not been filled connected to it.
This allows for the streets to be scored just like completed streets, except that they haven’t been entirely filled and this occurs after the last player action has been taken.
Other than that the same scoring and multipliers apply.
Target Audience
The box states that the game is recommended from ages 8 and up, which I could agree with if there is at least one slightly older person playing as well. This is simply because the scoring requires a bit of thought and that the players are accustomed to multiplication.
Much like Carcassonne however I would like to claim that the game is perhaps not the most interesting for younger players, at least the notion of placing market stalls is not something I recall being very intriguing at a young age.
Regardless I would like to claim that the games main target audience starts at the age of 12-14, when the players have become accustomed to multiplication and strategy starts becoming a more important part of games.
The art of the game is nice and could perhaps also lure younger players, and I would like to claim helps to sell the setting as well. Placing market stalls instantly becomes more engaging when the visuals of the board and playing pieces are well worked through.
As a final note though, unlike Carcassonne I found neither the box nor the name particularly interesting. Art-wise the box looks nice, but the subject matter is a bit bland. Other than the “board game of the year” awards there is little there that would make me interested in trying it out.
This analysis has thrown me off a bit, I’m sure that there are things I’ve missed and others that I have categorized wrong. Is the Placement System for instance really a single system, or is it several that I chose to simply label as one? Or should the Placement System be even wider to include the Bobby Movement System as well? Perhaps I am thinking too much in terms of “phases” rather than “systems”.

